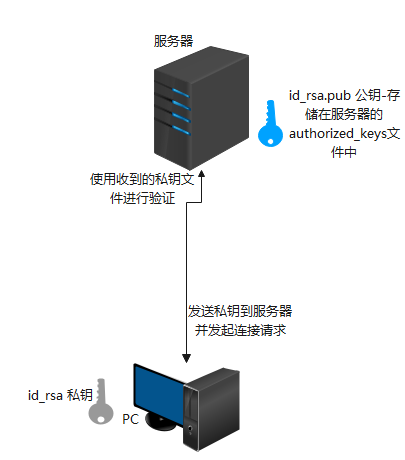
[root@localhost ~]# ssh-keygen -t rsa        #创建密钥文件
Generating public/private rsa key pair.
Enter file in which to save the key (/root/.ssh/id_rsa):     #存储路径这里默认
Created directory '/root/.ssh'.    #创建/root/.ssh、
Enter passphrase (empty for no passphrase):    #密钥文件密码(可选)
Enter same passphrase again: 	               #确认秘钥文件密码(可选)
Your identification has been saved in /root/.ssh/id_rsa.
Your public key has been saved in /root/.ssh/id_rsa.pub.
The key fingerprint is:
SHA256:/GnECRwfbqx4tJxqkIcsOMV5UO3fJQCelBJ5F4Q6d1U root@localhost.localdomain
The key's randomart image is:
+---[RSA 2048]----+
|  ..o+o=+...E    |
| . ooo=oo=..     |
|  + .=o.+o=      |
| o oooo=.B...    |
|o . =oooS.+o     |
| . . o o.o..     |
|      o   +      |
|     .   .       |
|                 |
+----[SHA256]-----+
[root@localhost ~]# cat ~/.ssh/id_rsa.pub >>~/.ssh/authorized_keys    #将生成的公钥放到authorized_keys中
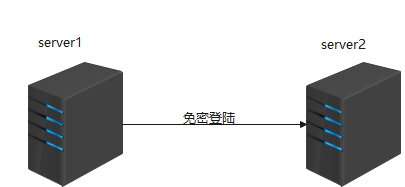
[root@server1 ~]# ssh-keygen -t rsa
Generating public/private rsa key pair.
Enter file in which to save the key (/root/.ssh/id_rsa):
Created directory '/root/.ssh'.
Enter passphrase (empty for no passphrase):
Enter same passphrase again:
Your identification has been saved in /root/.ssh/id_rsa.
Your public key has been saved in /root/.ssh/id_rsa.pub.
The key fingerprint is:
SHA256:m7C4gC1FF20/5KpfadDSHBKQEZbmoRWPpMRbAqn5/p0 root@server1
The key's randomart image is:
+---[RSA 2048]----+
|.+. OO.          |
|..o+B+o..        |
|..oOooo+.        |
|o.o..  =+.       |
| ..   +.S.       |
| +.  ..= +       |
|o.o ... *        |
| ....o +         |
|   .o.E          |
+----[SHA256]-----+
[root@server1 ~]# ssh-copy-id 192.168.101.2
/usr/bin/ssh-copy-id: INFO: Source of key(s) to be installed: "/root/.ssh/id_rsa.pub"
The authenticity of host '192.168.101.2 (192.168.101.2)' can't be established.
ECDSA key fingerprint is SHA256:aCn6wUHG7CKvLmBnrWxrR1VgmXbhPzBp0TusZJu2iWA.
ECDSA key fingerprint is MD5:b4:6e:1f:96:8e:16:00:d5:64:bd:fe:73:3d:5c:36:df.
Are you sure you want to continue connecting (yes/no)? yes
/usr/bin/ssh-copy-id: INFO: attempting to log in with the new key(s), to filter out any that are already installed
/usr/bin/ssh-copy-id: INFO: 1 key(s) remain to be installed -- if you are prompted now it is to install the new keys
root@192.168.101.2's password: 	#输入server2的登陆密码

Number of key(s) added: 1

Now try logging into the machine, with:   "ssh '192.168.101.2'"
and check to make sure that only the key(s) you wanted were added.